11/22/2013

Axapta X++ : Install axapta in windows 7 64bit

1. Copy and install same method in windows xp.
2. Set region and language in current language Unicode to Thai(Thailand).
in tab Administrative

3. Allow windows firewall ax32 and axdebug.


Axapta X++ : Create and Delete Template in Axapta.

1. Create by go to menu Inventory management --> Items and select item is prototype and click right select Record Info. Show dialog box.


1.1 Create template for all user in company click button Company accounts template. And set name template.
1.2 Create template for one user is mean is not show template all user. By click button User template and set name template.
Finish step create template.

2. Delete template. have two method.
2.1 Template is create by User template. We can delete by go to menu Inventory management --> Items and click new item. Show dialog box template you can choose template and click button delete in menu bar.
2.2 Template is create for all user in company it can't delete follow in step 2.1
If you must delete template follow step by.
Go to menu Basic ---> Setup ---> Record templates and click tab Templates. And choose template we must delete. Then click delete button in menu bar. Finish step delete template for all user company.


Axapta X++ : StrFind in axapta.

int StrFind (str text,str characters,int position,int number)

Examples
StrFind("ABCDEFGHIJ","KHD",1,10) //จากตำแหน่งที่ 1 นับไปข้างหน้า 10 ตัว ในช่วง 10 ตัวนั้นมี ค่าที่ให้หาเจอตัวแรก Return ตำแหน่ง
returns the value '4' (the position where "D" was found).
StrFind("ABCDEFGHIJ","KHD",10,-10) //จากตำแหน่งที่ 10 นับย้อนหลัง 10 ตัว ในช่วง 10 ตัวที่นับย้อนหลังไปนั้นมี ค่าที่ให้หาเจอตัวแรก Return ตำแหน่ง
returns the value '8' (the position where "H" was found).

Return ตำแหน่ง ในที่นี้ จะนับจากตัวแรกตำแหน่งที่ 1 เสมอ
ใส่ - คือนับย้อนกลับ ใส่ค่า + คือนับตามปกติ เท่ากับจำนวนตัวที่ต้องการ

Windows SKZ แก้ปัญหา เปลี่ยนรหัส Administrator

- Windows XP SKZ มีรหัส ติด Windows มา คือ skzcommunity
- เวลาเปลี่ยน Note book ตั้ง lock screen ต้องใส่รหัสบ่อย ๆ
- Reset รหัส ของ Administrator โดยการคลิกขวาที่ my computer เลือก menage เลือก User reset รหัส
แต่ตอนเปิดเครื่องจะมี Error และทำให้ Load file login ตอนเข้า windows ช้า

แก้ปัญหาด้วย
เข้าไปที่
- Start ---> Run พิมพ์ control userpasswords2
- เลือกชื่อ Administrator
- กดปุ่ม Reset Password

ลองปิดหน้าจอ Notebook แล้วเปิดใหม่ หรือปล่อยไว้ให้ Lock Screen ต่อไปก็จะไม่ต้องใส่รหัส ทุกครั้งที่พักหน้าจอ หรือ
ตอนเปิดเครื่อง

http://webmonster.sapaan.net/windows-xp-tips-tricks/%E0%B8%9B%E0%B8%B4%E0%B8%94%E0%B8%AD%E0%B8%AD%E0%B9%82%E0%B8%95%E0%B9%89%E0%B8%A5%E0%B9%8A%E0%B8%AD%E0%B8%81%E0%B8%AD%E0%B8%AD%E0%B8%99-how-to-disable-automatic-logon-windows-xp.html

8/24/2013

เปลี่ยน Boot logo และ Boot Animation Android I Mobile I Style Q2 หรือ รุ่นอื่น

***ผมไม่รับรองกับความเสียหายที่จะเกิดขึ้นกับเครื่อง น่ะครับแต่เครื่องผม ทำได้ตามนี้ครับ

1. สิ่งที่ต้องมี โปรแกรม LogoBuilder
2. เครื่องต้อง Root แล้วถึงจะเปลี่ยน Boot Animation ได้
3. ใช้โปรแกรม Flash Tool ในการ flash หรือเครื่องต้องทำการลง Clock Work Mod แล้ว เอาไฟล์ไป Update ผ่าน Zip ก็ได้

มันจะมีอยู่ทั้งหมด 3 ส่วนคือ
1 logo ตัวแรก (ถ้าจะเปลี่ยน ต้องใช้ sp_flash_tool เพื่อทำการเปลี่ยน logo.img )
2 animation ตอนเปิดเครื่อง
3 animation ตอนปิดเครื่อง

ส่วนที่ 1.
 - ดาวน์โหลดโปรแกรม LogoBuilder v1.2 จากที่นี่ http://www.mediafire.com/download/ekrbbwad109haxm/LogoBuilder_v1.2.zip
 - เปิดโปรแกรมขึ้นมาแล้ว กด Create new project เปิดไฟล์ logo.bin จากรอมศูนย์ เช่น  http://www.mediafire.com/?p41t1r8ty1tuczi  ของ I Style Q2 น่ะรุ่นใครรุ่นมัน Up ข้ามรุ่นไม่ได้
 - สร้างโฟลเดอร์ที่เราจะเก็บไฟล์ กด OK
 - กำหนดขนาดหน้าจอรุ่นที่ตัวเองใช้ (อย่างเช่น Q2, q2duo เป็น 480 x 800)  ส่วน Q3 เป็น 540 x 960)  ส่วนรุ่นอื่นก็ดูขนาดจอ ต่างกันออกไป ทำพลาดระวัง Boot ไม่ขึ้นครับ กด OK
 - โปรแกรมจะ preview รูปจากไฟล์ขึ้นมา รูปแรกจะเป็นโลโก้เขียวๆที่เราเห็นประจำ เราจะเปลี่ยนเจ้าตัวนี้แหละ
 - หาไฟล์ภาพนามสกุล .png ที่เราต้องการเปลี่ยน ขนาดเท่ากับหน้าจอของเรา แล้วเปลี่ยนชื่อเป็น img1.png  หรือ โหลดไฟล์นี้  http://www.mediafire.com/?9g90h7mtqqh3nzo
 - นำไฟล์ img1.png ก๊อปไปทับไว้ในโฟลเดอร์โปรเจ็คที่สร้างไว้ทีแรก
 - กด Make รอสักครู่...
 - โปรแกรมจะสร้างไฟล์ขึ้นมาใหม่ 2 ไฟล์ (update.zip และ logo.bin) อยู่ในโฟลเดอร์โปรเจ็คของเรา
 - ไฟล์ update.zip สามารถนำไป Update ผ่าน cwm ได้เลย หรือจะไฟล์ logo.bin ไป flash ผ่าน SP FlashTool ก็ได้

ไฟล์นี้ ทำเสร็จแล้วครับ เอาไป Flash หรือใช้ตัว Zip up date ผ่าน CWM ได้เลย ตัวนี้ใช้ได้ทั้ง I Style Q2ตัวแรก และ Q2 Duo น่ะครับเพราะขนาดหน้าจอเท่ากัน ครับ แตกไฟล์จะได้ 2 ไฟล์ .bin กับ .zip
Download   http://www.mediafire.com/?h19rxv48khpxsc5  
เป็นตัว MIUI ตามตัวอย่างใน Youtube ครับ

กำจัดส่วนที่เป็น Boot Logo สีเขียว ๆ ตอนที่เราเปิดเครื่องแล้วครับ ต่อมา ก็จะเปลี่ยน Boot Animation ที่จะทำงานต่อจาก Boot Logo และผมแถม Shutdown Animation ด้วย

ส่วน Boot Animation สามารถลบทิ้งหรือเปลี่ยนชื่อไฟล์ bootanimation.zip และ shutanimation.zip ไม่ต้องใช้เลยก็ได้มันจะกลายเป็นรุปหุ่น Android เหอะ ลองดูน่ะครับ แต่ถ้าต้องการให้เป็นแบบอื่นต้องหา Download Boot Animation มาครับ ตามส่วนที่ 2 และ 3

ส่วนที่ 2
Download Boot Animation ของ Google น่ะครับตัวนี้ เป็นตัว X  ที่  http://www.mediafire.com/download/wnv01nlg35arlst/bootanimation.zip
- Copy ใส่ โปรศัพท์ ใน SD หรือตัวเครื่องก็ได้ และจำที่อยู่มันไว้
- เข้าไปเปลี่ยนชื่อ Boot Animation เดิมของ I mobile ที่เป็นสี เขียว ๆ ก่อน ถ้าต้องการเก็บไว้ หรือไม่ต้องการก็ ลบทิ้ง ไปเลย แล้วใช้ Root Explorer หรือโปรแกรมอื่นที่สามารถเข้าไฟล์ System ของ Android ได้ Copy ไฟล์  bootanimation.zip ไปว่างไว้ใน /system/media/    อย่าลืม กด Mount จาก R/O เป็น Mount R/W ก่อนน่ะไม่งั่นจะว่างไม่ได้ แล้วก็ Set สิทธิ์ ตามนี้
ส่วนที่ 3 ตอนปิดเครื่องชื่อ shutanimation.zip ก็ทำเช่นกัน 

http://www.mediafire.com/download/t093qmkydk80g18/shutanimation.zip

- Copy ไฟล์  shutanimation.zip ไปว่างไว้ใน /system/media/    อย่าลืม กด Mount จาก R/O เป็น Mount R/W ก่อนน่ะไม่งั่นจะว่างไม่ได้ แล้วก็ Set สิทธิ์ ตามข้างบน bootanimation  เท่านี้ตอนปิดและตอนเปิดเครื่องเราก็จะไม่มีโลโก สีเขียวสว่าง จ้า และหารูป หา Animation ตามที่เราต้องการมาใส่แทนได้ ครับ

ที่ Download bootanimation  สำคัญคือเลือกขนาดหน้าจอให้ตรงกันกับเครื่องเราน่ะครับมันมีหลายขนาดดูดี ดี
http://androidbootanimation.com/


ลองดูน่ะครับรุ่นอื่นก็น่าจะทำได้ แต่ต้องมีไฟล์ logo.bin และเลือกขนาดหน้าจอให้ตรงกันน่ะครับ


Axapta X++ : สร้าง Dialog ใน Method

เรียกใช้ Dialog ได้เลย เช่นใน Method click หรืออื่น ๆ

  1. // Dalog Field.
  2.     Dialog                     dl;
  3.     DialogField             dfl;
  4.     WH_SobmitNo        transWH_SobmitNo;
  5. ;
  6.     dl  = new Dialog("Name Dialog");
  7.     dfl  = dl.addFieldValue(typeId(WH_SobmitNo),transWH_SobmitNo);
  8.     dfl.label("Name Show Label");
  9.  
  10.     if(dl.run()){
  11.          Print dfl.value();
  12.          pause;
  13.     }

Axapta X++ : ข้อมูล Enum แต่ต้องการแสดงตัวหนังสือ

ใช้คำสั่ง enum2str

เช่น   oRange.SetString(enum2str(TableInventTrans.TransType));

Mail : Setting Hotmail sand mail by other address.

1. login to hotmail
2. Click Seting and select by image.


3.ตั้งค่า 2 ที่คือ บัญชีอีเมล์ของคุณ และ แออเดรสในการตอบกลับ
4.เข้าไปใน บัญชีอีเมล์ของคุณ เลือก เพิ่มบัญชีส่งเท่านั้น


5.ใส่ชื่อเมล์ที่เราต้องการให้เป็นชื่อส่งออก คลิกส่งเมล์และตรวจสอบ จากนั้นเข้าไป login mail ที่เราใส่เพื่อยืนยัน


6.กลับมาที่หน้า ตั้งค่า Outlook เลือก แอดเดรส ด้านล่างที่จะให้เป็นตั้งเมล์ที่ใช้ส่งออกเริ่มต้น


7.ตั้งค่าส่วน แออเดรสในการตอบกลับ เป็นส่วนที่จะให้เมล์ที่เราตั้งไว้ขึ้น อัตโนมัติเมื่อผู้รับคลิกตอบกลับ หรือ Reply


JavaScript : Reset form

<script>
function formReset()
{
document.getElementById("frm1").reset();
}
</script>

Axapta X++ : บันทึกข้อมูลก่อน ปิดโปรแกรม Libre calc

oDocument.store(); //ให้ Save ก่อน
oDocument.dispose(); // ให้ ปิดโปรแกรม

Ubuntu : Install Alfresco 4

1. Install Ubuntu server 10.04 64 bit Or copy file ova for other computer.
2. Open program Virtualbox. Menu file import choose file Ubuntu 10.04-4 X64.ova
3. Next set ram up to 1024
4. Set network Bridged Adapter
5. Start Ubuntu in Virtualbox
5. ถ้าไม่ได้ IP หรือ Ping ไป Ip อื่นไม่ติด ให้ดู mii-tool ดู lan ที่เราใช้งานอยู่เป็น eth0 หรือ eth1
6. ลง Time server
  1. apt-get install ntp
และแก้ ntp
  1. nano /etc/ntp.conf
change server to 192.168.2.252 << NTP Server IP
7. Set proxy for Update
  1. nano /etc/apt/apt.conf
พิมพ์ Acquire::http { Proxy "http://192.168.2.252:9999"; }; เสร็จก็บันทึก update and upgrade ได้เลย
8. Downlosd from Alfresco http://wiki.alfresco.com/wiki/Download_and_Install_Alfresco Or Wget เอา แล้ว
  1. chmod 777 alfresco-community-4.2.c-installer-linux-x64.bin
9. Install by
  1. ./alfresco-community-4.2.c-installer-linux-x64.bin
7. If error stop and install packed
  1. sudo apt-get install libice6 libsm6 libxt6 libxrender1 libfontconfig1

8. Read and follow by step.
9. finish test http://192.168.0.184:8080/alfresco/

Android :: JSON SQL ภาษาไทย

ในการดึงข้อมูลจาก MySQL ในฝั่ง Server นั้นจะใช้ PHP ในการดึงข้อมูลและเปลียนให้อยู่ในรูปแบบของ JSON เพื่อสามารถที่จะนำมาใช้กับ Android ได้ ต้องดึงข้อมูลเป็น UTF 8 เท่านั้นถึงจะแสดงภาษาไทยได้

Code ในส่วนของฐานข้อมูล MySQL ต้องเป็น (utf8_general_ci) :

ที่ไฟล์ติดต่อ ฐานข้อมูล PHP
//ดึงข้อมูลออกมาในรูปแบบ UTF 8
  1. mysql_query("SET NAMES UTF8");
  1. // connecting to db
  2. $db = new DB_CONNECT();
  3. mysql_query("SET NAMES UTF8");
  4. $result = mysql_query("SELECT *FROM products") or die(mysql_error());

http://thaidroiddev.blogspot.com/2011/07/database-mysql-php-json.html

Edit โปรแกรมเงินเดือน(BplusPayroll)

Step install program.
1. setup program Payroll version 4.1 by mount Image file .iso
2. Open program and create database.
3. In manu tools select นำสำเนาข้อมูลกลับมาใช้งาน and enter user name password. Download file zip from zimbra. File zip extra file befor import.
4. After import program use user name and password new.

Step edit report in program.
1.Enter to manu report and select register reports.
2.Select report we must and click right select สำเนารายงาน
3.Click right select edit rename report and rename file report (by insert -SCI append.)
4.Enter to folder Report in "C:\Program Files\EBP\BplusPayroll\Report" and rename file follower number 3.
5.Open report in number 4. By program Seagate Crystal Reports (version 8.)
6.Enter to menu Insert > Database Field..., Parameter Field... แล้วแต่กรณี
7.Drag field insert to report. If not field you must create field by click right and select new. Set name and other field finish click save.
8.Click right for setting format field... follower format we use.
9.Test report by select date 14/6/2556 - 14/6/2556 and insert taxid13. if show in report ok finish step edit report.

Ubunt : Software RAID 5 + LVM

Example link and other information. open http://intranet.sci.com/blog.php?u=3&b=775
Step software raid 5.
1. Install Ubunt 10.04 server 32bit
2. Install time server
  1. apt-get install ntp
  2. nano /etc/ntp.conf

change server to 192.168.2.252 << NTP Server IP
3.Set proxy for Update
  1. nano /etc/apt/apt.conf
พิมพ์ Acquire::http { Proxy "http://192.168.2.252:9999"; }; finish save file and update and upgrade.
4.
  1. Install apt-get install mdadm lvm2

5. Shutdown ubuntu and add hdd in setting storage tree drive.
6. Start Ubuntu
7. Check disk
  1. fdisk -l
  2. fdisk /dev/sdb
Create partition
8. Create partition:
  1. mdadm --create --verbose /dev/md0 --level=5 --raid-devices=3 /dev/sdb1 /dev/sdc2 /dev/sdd3
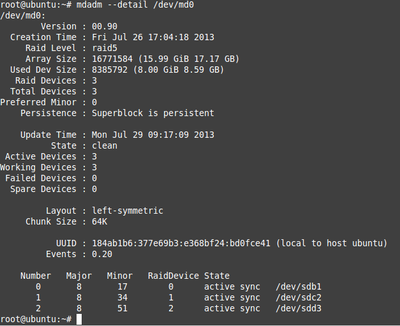
9. Check :
  1. mdadm --detail /dev/md0
10. Save file in config for use startup next time.
  1. mdadm -Es | grep md  >>/etc/mdadm/mdadm.conf
11. Test remove hdd on partition and start ubuntu.
//////////////////////////////////////////////////////////////////////////////////////////////////////////////////////////////////

Step software LVM. use ubuntu old in software raid 5.
1. Create partition Physical Volume.
  1. pvcreate /dev/md0
2. Create Volume Group.
  1. vgcreate vg1 /dev/md0
  2.     vgdisplay
3. Create Logical Volume (xxxxx is mean Total PE number in number 5 example 4094 )
  1.    lvcreate -l xxxxx -n lv1 vg1 /dev/md0
  2.     lvdisplay
4. Format to ext4 or other type partition.
  1. mkfs.ext4 /dev/vg1/lv1
5. Create directory and mount. by edit file /etc/fstab and add.
  1. /dev/vg1/lv1       /DATA            ext4        defaults        0        0
6. Command mount partition.
  1.    mkdir /DATA
  2.     mount -a
7. Check partition.
  1. df -h /DATA
Finish step software LVM.

//////////////////////////////////////////////////////////////////////////////////////////////////////////////////////////////////
Step software LVM is not set raid. use ubuntu old in software raid 5.
1. Add hdd in virtualbox 3.
2. Start ubuntu and fdisk -l see disk. Example sde , sdf , sdg
3. Create disk by use commad
  1. fdisk /dev/sdb
And create disk in step by step.
4. Fdisk -l for see disk. Example sde1 , sdf2 , sdf3.
5. Create Physical Volume :
  1. pvcreate /dev/sde1
6. Create Volume Group :
  1. vgcreate lvm /dev/sde1
And test display
  1. vgdisplay
7. Add disk to Volume Group by use command :
  1. vgextend lvm /dev/sdf2
And
  1. vgextend lvm /dev/sdg3
 And test display :
  1. vgdisplay

8. Create Logical Volume (xxxxx is mean Total PE in number 7.)
  1.    lvcreate -l xxxxx -n lv1 lvm
  2.     lvdisplay

9. Format to ext4 or other type partition.
  1. mkfs.ext4 /dev/lvm/lv1

10. Create directory and mount. by edit file /etc/fstab and add.
  1. /dev/lvm/lv1       /DATALVM           ext4        defaults        0        0

11. Command mount partition.
  1.    mkdir /DATALVM
  2.     mount -a

12. Check partition.
  1. df -h /DATALVM
Finish step software LVM formate hdd is not set raid.

Axapta X++ : Create and Delete Template in Axapta.

1. Create by go to menu Inventory management --> Items and select item is prototype and click right select Record Info. Show dialog box.

1.1 Create template for all user in company click button Company accounts template. And set name template.
1.2 Create template for one user is mean is not show template all user. By click button User template and set name template.
Finish step create template.

2. Delete template. have two method.
2.1 Template is create by User template. We can delete by go to menu Inventory management --> Items and click new item. Show dialog box template you can choose template and click button delete in menu bar.
2.2 Template is create for all user in company it can't delete follow in step 2.1
If you must delete template follow step by.
Go to menu Basic ---> Setup ---> Record templates and click tab Templates. And choose template we must delete. Then click delete button in menu bar. Finish step delete template for all user company.

8/22/2013

Axapta X++ : StrFind in axatata.

int StrFind (str text,str characters,int position,int number)

Examples
StrFind("ABCDEFGHIJ","KHD",1,10) //จากตำแหน่งที่ 1 นับไปข้างหน้า 10 ตัว ในช่วง 10 ตัวนั้นมี ค่าที่ให้หาเจอตัวแรก Return ตำแหน่ง
returns the value '4' (the position where "D" was found).
StrFind("ABCDEFGHIJ","KHD",10,-10) //จากตำแหน่งที่ 10 นับย้อนหลัง 10 ตัว ในช่วง 10 ตัวที่นับย้อนหลังไปนั้นมี ค่าที่ให้หาเจอตัวแรก Return ตำแหน่ง
returns the value '8' (the position where "H" was found).

Return ตำแหน่ง ในที่นี้ จะนับจากตัวแรกตำแหน่งที่ 1 เสมอ
ใส่ - คือนับย้อนกลับ ใส่ค่า + คือนับตามปกติ เท่ากับจำนวนตัวที่ต้องการ

6/18/2013

Linux: การเปลี่ยนภาษาด้วย "~" grave accent สำหรับ Linux Mint 15

การเปลี่ยนภาษาด้วย "~" grave accent สำหรับ Linux ตระกูล Debian (Mint,Ubuntu,Tle ...)
0. download  http://noc.rmutl.ac.th/main/wp-content/plugins/download-monitor/download.php?id=29  แล้วแตกไฟล์
1. เปิด Terminal ขึ้นมา แล้วเปลี่ยนสิทธิเป็น Root
2. เข้าไปยังโฟลเดอร์ grave-key  ที่แตกไว้ตามข้อ 0.
3. เป็นสิทธิของไฟล์ script.sh ให้สามารถทำงานได้ โดยใช้คำสั่ง chmod 755 script.sh
4. สั่งให้ไฟล์ Script ทำงาน โดยใช้คำสั่ง ./script.sh
5. เข้าไปแก้ไขค่าของคีย์บอร์ด โดยไปที่ menu –> Control Center –> Keyboard –> Layouts –> Layouts Options
6. เข้าไปเช็คบ็อคในส่วนของ Grave switches layout

http://www.gotoknow.org/posts/372164

6/13/2013

Ubuntu : Update flash player for webborwser.

User command in terminal.
[code=text]sudo apt-get install flashplugin-installer[/code]

PHP : HTTP_REFERER เช็คว่ามาจาก URL นี้หรือไม่

เพิ่มระดับความปลอดภัยของ PHP ที่มีการติดต่อ กับ Mysql
- เป็นการเช็คว่า URL ที่เข้ามาเป็น URL ที่มาจาก SERVER หรือ URL เราหรือมาจาก SERVER อื่น ป้องกันการ HACK

[code=text]if($_SERVER['HTTP_REFERER'] != "http://intranet.sci.com/scivalve/register.php") {
   //echo $_SERVER['HTTP_REFERER'];
    echo js_close();
    exit();
} [/code]

PHP JavaScript : Action Checkbox Object

[url]http://code.function.in.th/javascript/checkbox[/url]

SQL: "IN" Condition

The syntax for the "IN" condition is:
[code=text]expression in (value1, value2, .... value_n);[/code]

SQL "IN" Condition - Character example
[code=text]SELECT *
FROM suppliers
WHERE supplier_name in ('IBM', 'Hewlett Packard', 'Microsoft');[/code]

[url]http://www.techonthenet.com/sql/in.php[/url]

Linux Mint 15 : Set show name computer in network group.

- Use command in terminal.
[code=text]sudo nano /etc/samba/smb.conf [/code]

- Edit  workgroup from [code=text]workgroup = workgroup[/code] to  [code=text]workgroup = sci[/code]
- Reboot your computer.

PHP : การตัดข้อความด้วย PHP

http://www.ninenik.com
เมื่อต้องการตัดข้อความบางส่วนออกจากข้อความต้นฉบับ สามารถใช้ฟังก์ชัน substr() ของ PHP ในการตัดข้อความ ดังนี้
การใช้งาน
1. substr ( string string, int start [, int length] )  
โดยคำสั่ง substr() จะส่งกลับค่าส่วนของข้อความ string ที่กำหนดจุดเริ่มต้น start และ จำนวนความยาวที่ต้องการ length
ตัวอย่างการใช้งานกรณี start มีค่าไม่เป็นลบ

  1. <?php   
  2. $rest = substr("abcdef", 1);    // returns "bcdef"   
  3. $rest = substr("abcdef", 1, 3); // returns "bcd"   
  4. $rest = substr("abcdef", 0, 4); // returns "abcd"   
  5. $rest = substr("abcdef", 0, 8); // returns "abcdef"   
  6. ?>  
ตัวอย่างการใช้งานกรณี start มีค่าติดลบ จะเริ่มนับจากด้านหลังของข้อความเข้ามา เช่น -3 หมายถึงเริ่มจากตัวที่ 3 โดยนับจากด้านหลังข้อความ

  1. <?php   
  2. $rest = substr("abcdef", -1);    // returns "f" เริ่มนับจากตัว f  
  3. $rest = substr("abcdef", -2);    // returns "ef" เริ่มนับจากตัว e  
  4. $rest = substr("abcdef", -3, 1); // returns "d" เริ่มนับจากตัว d  
  5. ?>  
ตัวอย่างกรณีถ้าค่า start มากกว่า ความยาวของข้อความต้นฉบับ จะส่งค่ากลับเป็น FALSE

  1. <?php   
  2. $rest = substr("abcdef", 8,4);     
  3.  // returns FALSE ข้อความยาวแค่ 6 ตัวอักษร  
  4. // แต่ค่า start เป็น 8 มากกว่าความยาวของค่าความจึงส่งค่ากลับมาเป็น FALSE  
  5. ?>  
กรณีค่า length มีค่าเป็นบวก หมายถึงจำนวนข้อความที่ต้องการตัดเท่ากับค่า length นั้นๆ
กรณีค่า length มีค่าเป็นลบ หมายถึงการระบุตำแหน่งสุดท้ายของข้อความที่ต้องการ โดยตัดข้อความที่นับจากด้านหลังออก เช่น -1 หมายถึงนับจากตัวสุดท้ายมา 1 ตัวให้ตัดออกไป
ตัวอย่างกรณีค่า length มีค่าเป็นลบ

  1. <?php   
  2. $rest = substr("abcdef", 0, -1);  // returns "abcde"   
  3. // ตัดข้อความจากตัวแรก a ไปจนถึง ตัว e โดยตัดข้อความที่นับจากหลังมา 1 ตัวออกไป  
  4. $rest = substr("abcdef", 2, -1);  // returns "cde"   
  5. $rest = substr("abcdef", 4, -4);  // returns ""   
  6. $rest = substr("abcdef", -3, -1); // returns "de"   
  7. ?>  

2/22/2013

การใช้สูตร คำนวณอายุงานใน Excel

ใช้คำสั่ง DATEDIF ครับ

B                        C                         D                                      E
Start Date   Today
8/16/2002   2/8/2011        =DATEDIF(B18,C18,"Y")                     8
8/16/2002   2/8/2011        =DATEDIF(B19,C19,"M")                 101
8/16/2002   2/8/2011        =DATEDIF(B20,C20,"D")               3098
8/16/2002   2/8/2011        =DATEDIF(B21,C21,"Y")                     8
8/16/2002   2/8/2011        =DATEDIF(B22,C22,"YM")                   5
8/16/2002   2/8/2011        =DATEDIF(B23,C23,"MD")                 23

โดย
Y = จำนวนปี (ต้องครบ 1 ปีเต็ม จึงจะแสดงค่า)
M = จำนวนเดือน (ต้องครบ 1 เดือนเต็ม จึงจะแสดงค่า และจะนับรวมเดือนทั้งหมดของวันที่ต้องการเปรียบเทียบ)
D = จำนวนวัน (นับรวมวันทั้งหมดของวันที่ต้องการเปรียบเทียบ)
YM = นับจำนวนเดือนใน 1 ปี    เช่น ถ้า 1 ปี 3 เดือน จะแสดงค่าเป็นเลข 3 (แสดงเฉพาะค่าเดือนเท่านั้น)
MD = นับจำนวนวันใน 1 เดือน   เช่น ถ้า 1 ปี 3 เดือน กับอีก 15 วัน ก็จะแสดงเป็น 15 (แสดงเฉพาะจำนวนวันเท่านั้น)
ลองเอาไปประยุกต์ใช้ดูได้นะครับ เช่น
=DATEDIF(A1,B1,"Y") & "-" & DATEDIF(A1,B1,"YM") & "-" & DATEDIF(A1,B1,"MD") 
หรือ
=DATEDIF(A1,B1,"Y") & "ปี " & DATEDIF(A1,B1,"YM") & "เดือน " & DATEDIF(A1,B1,"MD")& "วัน"

โดย A1 เป็นวันเริ่มงานและ B1 เป็นวันปัจจุบัน
http://guru.google.co.th/guru/thread?tid=0b2fbde68a6c73d9

2/05/2013

Ubuntu : Easy image resizing and rotating in Ubuntu

ลดขนาดเพิ่มรูป ใน ubuntu

"To download and install, go to use System, Administration, Synaptic Package Manager. Type in your password when prompted. Click on Seach and type in nautilus-image-converter or caja-image-converter.By see linux system. Once it has been found, right click on it and select "Mark for Installation". Click Apply and wait for the download and installation. The file is only 279kB, so it won't take long.

"Once the installation is completed, using the Nautilus File Manager, you'll be able to right click on an image, select "Resize image..." or "Rotate image..." and do various thing to it. The most obvious being to resize or rotate images!"

**After install reboot linux once.


http://www.linuxtoday.com/infrastructure/2009013001735OSDTSW

Thunderbird : read receipts mail thunderbird.

วิธีตั้งค่า ให้รู้ว่าผู้รับอีเมลปลายทางเปิดเมลที่เราส่งไป ของโปรแกรม Thunderbird

1. คลิกที่เมนู Tools >คลิกเลือกที่ Account Settings...


2.คลิกที่เมนู Return Receipts > คลิกเลือกที่ Customize return receipts ... > คลิกเครื่องหมายถูกที่ When sending messages... > และคลิกที่ปุ่ม OK ก็เป็นอันเสร็จขั้นตอน

3. เมื่อผู้รับปลายทางเปิดเมล์ ที่เราส่งไปจะมีเมลแจ้งกลับมาตามรูปด้านล่างโดยระบุ Subject ที่เราส่งไปและในเนื้อเมลจะแสดงอีเมลปลายทาง


ที่มา http://support2.truecorp.co.th/detail.aspx?document_id=263

Ubuntu : ติดตั้ง Proxy สำหรับให้บริการ Internet and web block

1. ติดตั้ง Squid3 และ apache2
  1. apt-get install squid3

  1. apt-get install apache2


2. ติดตั้ง lightsquid ไว้ดู log
doload http://sourceforge.net/projects/lightsquid/files/ เอาไปไว้ใน var/www/ เพื่อจะ wget เอา
  1.    wget http://sourceforge.net/projects/lightsq ... lightsquid-1.8.tgz  หรือ wget http://192.168.0.244/...ชื่อไฟล์
  2.     tar xvzf lightsquid-1.8.tgz
  3.     mv lightsquid-1.8 /usr/local/lightsquid


4. ตั้งค่า lightsquid
  1. nano /usr/local/lightsquid/lightsquid.cfg

แก้ Code ตรง #path to tpl folder ตามนี้
  1.    #path to tpl folder
  2.     $tplpath             ="/usr/local/lightsquid/tpl";
  3.     #path to lang folder
  4.     $langpath            ="/usr/local/lightsquid/lang";
  5.     #path to report folder
  6.     $reportpath          ="/usr/local/lightsquid/report";
  7.     #path to access.log
  8.     $logpath             ="/var/log/squid3"; ## log Files
  9.     #path to `ip2name` folder
  10.     $ip2namepath         ="/usr/local/lightsquid/ip2name";


ตรวจสอบ config ด้วยคำสั่ง ที่แก้ว่าถูกหรือปล่าว
  1. /usr/local/lightsquid/check-setup.pl


5. คำสั่งที่เกี่ยวข้องใน squid3 มี  /etc/ini.d/squid3 status, start, stop, reload, force-reload, restart
6. ตั้งค่า config ของไฟล์ squid.conf เป็นการกำหนดสิทธิ์ว่าจะให้ทำอะไร ให้เอา User จากไหน ให้ผ่าน ออกเน็ต ยังไง
edit by fine word HERE TO ALLOW ACCESS FROM YOUR CLIENTS.
เช่น
ให้ออกเน็ตได้หมด เพิ่ม
  1. acl localnet src 192.168.0.0/24
  2. http_access allow localnet
  3. http_access allow localhost
  4.  

หรือถ้าจะใช้ user ใน AD ของ SERVER ก็เพิ่ม
  1.    auth_param basic program /usr/lib/squid3/squid_ldap_auth -R -b "dc=sci,dc=com" -D "cn=Administrator,cn=Users,dc=sci,dc=com" -w "password" -f "sAMAccountName=%s" -h 192.168.0.254
  2.         auth_param basic children 5
  3.         auth_param basic realm Squid proxy-caching web server
  4.         auth_param basic credentialsttl 5 minutes
  5.      
  6.     #acl localnet proxy_auth REQUIRED src 192.168.0.0/24
  7.     #http_access allow localnet
  8.      
  9.     external_acl_type InetGroup %LOGIN /usr/lib/squid3/squid_ldap_group -R -b "dc=sci,dc=com" -D "cn=Administrator,cn=Users,dc=sci,dc=com" -w "password" -f "(&(objectclass=person)(sAMAccountName=%v)(memberof=cn=%a,ou=InternetUser,dc=sci,dc=com))" -h 192.168.0.254
  10.     acl InetAccess external InetGroup InetAllow
  11.     http_access allow InetAccess

///ยังไม่ค่อยเข้าใจ Code ดูต่อ
แล้ว Reload apache2
  1. /etc/init.d/apache2 reload


7. ทดลองใช้งาน set porxy ของเครื่อง 192.168.0.9 Port  3218 แล้วลองเข้า Internet ดู
8. ดู log เข้าไปที่http://192.168.0.9/lightsquid/ ลองเข้าดู
9.สั่งให้ generate report ทุกวัน ด้วยแก้ไฟล์

แล้วเพิ่ม
  1. 0 0 * * * /usr/local/lightsquid/lightparser.pl
หรือ
  1. @daily /usr/local/lightsquid/lightparser.pl


Block Web

1. Edit file squid.conf. use command
  1. /etc/squid3/squid.conf

2. เพิ่มเงื่อนไขในการ Block ใช้ ALC เหมือนข้างบน เช่น
ส่วนไฟล์ทำขึ้นเอง เป็น .txt แล้วพิมพ์ชื่อ web ลงไป  เช่น facebook.com ......
หรือ จะ copy เอาจาก SERVER2 ก็ได้อยู่ใน /var/www/cc/sci/ มี2ไฟล์ คือ webblocked_tmp.txt (Block เป็นเวลา), webblocked.txt (Block ตลอด)
แล้วเอามาไว้ที่เราต้องการของ เครื่อง SERVER เช่นในที่นี้เอาไว้ใน /var/log/squid3/
  1. acl webblocked url_regex '/var/log/squid3/webblocked.txt' # ที่อยู่ของไฟล์ log
  2.  acl day_am time 08:00-12:00
  3.  acl day_pm time 13:00-17:40
  4.  http_access deny webblocked day_am
  5.  http_access deny webblocked day_pm

Ubuntu : Install OCS Inventory NG

วิธีการติดตั้ง OCS Server สำหรับจัดเก็บข้อมูลอุปกรณ์คอมพิวเตอร์
Other link
http://intranet.sci.com/blog.php?u=3&b=206
http://intranet.sci.com/blog.php?u=3&b=666

1.Install Ubuntu 10.04 Server
2.Edit sourlist
3.update and upgrade
4.Edit network/interface ใส่ตั้งค่า ip
  1. nano /etc/network/interfaces

4.1 Insert Code in file replace iface.
  1.    iface eth0 inet static
  2.             address 192.168.0.9
  3.             netmask 255.255.255.0
  4.             network 192.168.0.0
  5.             broadcast 192.168.0.255
  6.             gateway 192.168.0.2

4.2 restart network by use command
  1. /etc/init.d/networking restart

4.3 edit file hosts by insert
  1. 192.168.0.9   samba-server.sci.com    samba-server

4.4 Set time from server

change server to 192.168.0.252 << NTP Server IP
5. Install apache, php, mysql
  1.    apt-get install apache2
  2.     apt-get install php5 libapache2-mod-php5 php5-gd
  3.     apt-get install mysql-server
  4.     apt-get install libapache2-mod-auth-mysql php5-mysql phpmyadmin
  5.  
  6.     apt-get install make
  7.     sudo aptitude install libc6-dev
  8.  
  9.     #PERL module
  10.     apt-get install libxml-simple-perl
  11.     apt-get install libcompress-zlib-perl
  12.     apt-get install libdbi-perl
  13.     apt-get install libdbd-mysql-perl
  14.     apt-get install libapache-dbi-perl
  15.     apt-get install libnet-ip-perl
  16.     apt-get install libsoap-lite-perl
  17.     cpan -i XML::Entities

6. download OCSNG_UNIX_SERVER https://launchpad.net/ocsinventory-server/
7. Copy file to www of host install apacher. and use command wget form host.

8. tar -xvzf OCSNG_UNIX_SERVER-2.0.5.tar.gz
9. cd OCSNG_UNIX_SERVER-2.0.x
10. ./setup.sh
*ตอบตามขั้นตอน ถ้าติดตั้งโปรแกรมต่าง ๆ ไว้พร้อมแล้ว จะสามารถใช้ค่า default ได้เลย เสร็จแล้ว restart apache
*ดูรายละเอียดที่ http://wiki.ocsinventory-ng.org/index.php/Documentation:Server#Under_Linux_Operating_System
  1. Do you wish to continue ([y]/n)? y
  2. Which host is running database server [localhost] ? [enter]
  3. On which port is running database server [3306] ? [enter]
  4. Where is Apache daemon binary [/usr/sbin/apache2] ? [enter]
  5. Where is Apache main configuration file [/etc/apache2/apache2.conf] ? [enter]
  6. Which user account is running Apache web server [www-data] ? [enter]
  7. Which user group is running Apache web server [www-data] ? [enter]
  8. Where is Apache Include configuration directory [//etc/apache2/conf.d/] ? [enter]
  9. Where is PERL Intrepreter binary [/usr/bin/perl] ? [enter]
  10. Do you wish to setup Communication server on this computer ([y]/n)? y
  11.  
  12. เพิ่ม
  13. Enter 1 for mod_perl 1.99_21 or previous.
  14. Enter 2 for mod_perl 1.99_22 and higher.
  15. Which version of Apache mod_perl the computer is running ([1]/2) ?2
  16.  
  17. *** ที่ไม่มีให้ตอบ Y แล้วมันจะลงใหม่ Perl
  18. OCS setup.sh can install perl module from packages for you
  19. The script will use the native package from your operating system like apt or rpm
  20. Do you wish to continue (y/[n])?y
  21. ตอบ Y ลงตามตัวที่มันขาดไปเรื่อย ๆ ตามจำนวน packet ที่ขาด
  22.  
  23.  Where to put Communication server log directory [/var/log/ocsinventory-server] ? [enter]
  24. To ensure Apache loads mod_perl before OCS Inventory NG Communication Server, Setup can name Communication Server Apache configuration file 'z-ocsinventory-server.conf' instead of 'ocsinventory-server.conf'. Do you allow Setup renaming Communication Server Apache configuration fileto 'z-ocsinventory-server.conf' ([y]/n) ? y
  25. Do you wish to setup Administration Server (Web Administration Console) on this computer ([y]/n)? y
  26. Do you wish to continue ([y]/n)? y
  27.  
  28. Where to copy Administration Server static files for PHP Web Console [/usr/share/ocsinventory-reports] ? [enter]
  29. Where to create writable/cache directories for deployement packages and IPDiscover [/var/lib/ocsinventory-reports] ? [enter]

11. restart apache
  1. /etc/init.d/apache2 restart

12. test enter to host.
insert username and password for enter to SQL and Database.
13. click submit qurey
15. Click here to enter OCS-NG GUI
16. login เพื่อใช้งานครั้งแรก โดยใช้ user=admin password=admin (login ได้แล้วให้เปลี่ยน password ทันที)
17. Error red color top the page.
  1. SECURITY ALERT!
  2. Your install.php exists in your installation directory.
  3. The default SQL login/password is activate on your database: ocsweb
  4. The default login/password is activate on OCS-NG GUI


- delete file in directory install /usr/share/ocsinventory-reports/ocsreports/install.php
- cheng password admin login.
- Edit file dbconfig.inc.php by use command
  1. nano /usr/share/ocsinventory-reports/ocsreports/dbconfig.inc.php

edit define("PSWD_BASE","...password you use...");
1.1 Enter to PHPmyadmin in Table mysql ---> User setup Function to Password and insert password as "PSWD_BASE" and save it.
1.2 click localhost top on the page. select Privileges and click reload the privileges on under the page text red color.
18. test program by download OCSNG-Windows-Agent-2.0.4.0.zip from http://intranet.sci.com/blog.php?u=3&b=666
18.1 Extrace file OCSNG-Windows-Agent-2.0.4.0.zip and install OCS-NG-Windows-Agent-Setup.exe in windows.
18.2 Insert IP in step setup SERVER URL. example : http://192.168.0.9/ocsinventory
18.3 Reload page see computer in program. Finish setup
*** After setup OCS-NG-Windows-Agent-Setup.exe is not show in programe.
user comnand
  1. /etc/apache2/conf.d/z-ocsinventory-server.conf

Edit password user connect to mysql

  1. # Password for user
  2.   PerlSetVar OCS_DB_PWD 123456


Or case other. we can see log file for OCS.
Launcher OcsLogon.exe always create a log file “OcsLogon.log” into temporary folder.
When launched through a computer GPO, this folder is usually “C:\Windows\Temp”.
When launched through a user GPO or login script, this folder is usually “C:\Documents and Settings\User Profile\Local settings\Temp” or “C:\Users\User Profile\AppData\Local\Temp”.

Axapta : Database log

วิธี Set Database log ของ Axapta
1. ที่ Set เข้าไปที่ Administration --->Setup -->Database log
2. New ขึ้นมาใหม่ Next เสร็จแล้วเลือก Table and fields ที่ต้องการ Set เก็บ log แล้วเลือก Next ติ๊ก 3 ชื่อที่จะเก็บ D I U คือ Delete, Insert, Update แล้วกด Finish
จากนั้นก็ทดลองแก้ไขข้อมูล แล้วดูว่าขึ้นใน log หรือปล่าว
เข้าไปดูโดย
1. โดยคลิกขวาแล้วเลือก Record info เลือก Database log
2. หรือเข้าไปดูที่ เก็บ Log รวมได้เลย เข้าไปที่
Administration ---> Inquiries ---> Database log แล้วค้นหาเอาหรือเรียงวันที่ดูเอา แต่จะช้าข้อมูลเยอะ

VirtualBox : Run as Service (Linux)


ที่มา : http://www.glump.net/howto/virtualbox_as_a_service
http://intranet.sci.com/blog.php?u=3&b=669

1.Setup VirtualBox ให้เรียบร้อย
2.สร้าง Config ไฟล์


sudo touch /etc/default/virtualbox
sudo nano /etc/default/virtualbox

  1. SHUTDOWN_USERS="user1 user2" # space-delimited list of users who might have runnings vms. Excemple "sa"
  2. SHUTDOWN=savestate           # if any are found, suspend them to disk

3.สร้าง script สำหรับเรียกใช้งาน (ที่มา https://github.com/bkidwell/vbox-service-template)
*ตั้งชื่อไฟล์ว่า vbox-ตามด้วยชื่อของ VM เช่น vbox-OCS-SERVER แล้วแก้ไขข้อมูลใน script ให้ตรงกับสภาพแวดล้อมของ VM
  1. #! /bin/sh
  2. #
  3. # chkconfig: 2345 90 10
  4. ### BEGIN INIT INFO
  5. # Provides:          vbox-service-template
  6. # Required-Start:    $remote_fs $syslog
  7. # Required-Stop:     $remote_fs $syslog
  8. # Default-Start:     2 3 4 5
  9. # Default-Stop:      0 1 6
  10. # Short-Description: 'service-template' virtual machine
  11. # Description:       Starts and stops a VirtualBox host as a service.
  12. ### END INIT INFO
  13.  
  14. # Author: Brendan Kidwell <brendan@glump.net>
  15. # License: GPL 3 <http://opensource.org/licenses/GPL-3.0>
  16. #
  17. # Based on /etc/init.d/skeleton from Ubuntu 12.04.
  18.  
  19. #-------------------------------------------------------------------------------
  20. #
  21. #  CONFIGURATION
  22. #
  23. #  What is the name of the VM exactly as it appears in the VirtualBox control
  24. #  panel? This is the 'name' and the 'long name' of the VM.
  25. #
  26. #     Does 'name' contain spaces or other special characters? If so, you must
  27. #     make up some other value for 'name' that doesn't have spaces.
  28. #
  29. #  Setup:
  30. #
  31. #  1. Copy this file to /etc/init.d/vbox-'name'. The filename must start with
  32. #     the prefix "vbox-". Make sure you set the 'x' bit on the file to make it
  33. #     executable.
  34. #
  35. #  2. Edit 'Provides', above, to match the filename.
  36. #
  37. #  3. Edit 'Short-Description' to describe the function of the VM.
  38. #
  39. #  4. If 'long name' is different from 'name' fill it in below, otherwise leave
  40. #     LONGNAME as an empty string.
  41.      VM_LONG_NAME=""   # Exemple "NameVM", Exemple "Proxy"
  42. #
  43. #  5. What user owns the virtual machine?
  44.      VM_OWNER=???   # Insert name by number 1. Exemple "sa"
  45. #
  46. #  6. Which stop command? "hibernate" or "powerbutton"
  47.      VM_STOP=hibernate
  48. #
  49. #  7. For the 'start-wait' command -- waiting until network is up, what is the
  50. #     VM's hostname?
  51.       VM_HOSTNAME=""
  52. #
  53. #-------------------------------------------------------------------------------
  54.  
  55. # Do NOT "set -e"
  56.  
  57. # PATH should only include /usr/* if it runs after the mountnfs.sh script
  58. PATH=/sbin:/usr/sbin:/bin:/usr/bin
  59. # Pull DESC from file header
  60. DESC=`grep --max-count=1 "^# Short-Description:" $(readlink -f $0)|cut --delimiter=' ' --field=3-|sed 's/^ *//'`
  61. # Pull NAME from file header
  62. NAME=`grep --max-count=1 "^# Provides:" $(readlink -f $0)|cut --delimiter=' ' --field=3-|sed 's/^ *//'`
  63. SCRIPTNAME=/etc/init.d/$NAME
  64.  
  65. MANAGE_CMD=VBoxManage
  66.  
  67. # Get VM_SHORT_NAME from service name
  68. VM_SHORT_NAME=`echo $NAME|cut --delimiter='-' --field=2-`
  69. # Actual filename of VM is VM_SHORT_NAME, or if VM_LONG_NAME is set, use that
  70. if [ ! "$VM_LONG_NAME" ] ; then VM_LONG_NAME=$VM_SHORT_NAME ; fi
  71.  
  72. # Do not use 'sudo' if this script is actually running as VM_OWNER already
  73. if [ `whoami` = $VM_OWNER ] ; then SUDO_CMD="" ; else SUDO_CMD="sudo -H -u $VM_OWNER" ; fi
  74.  
  75. # Set VBoxManage command for stop action
  76. if [ $VM_STOP = powerbutton ] ; then VM_STOP_CMD=acpipowerbutton ; else VM_STOP_CMD=savestate ; fi
  77.  
  78. # If VM_HOSTNAME isn't set (for 'start-wait' command) use VM_SHORTNAME
  79. if [ ! "$VM_HOSTNAME" ] ; then VM_HOSTNAME=$VM_SHORT_NAME; fi
  80.  
  81. # Load the VERBOSE setting and other rcS variables
  82. . /lib/init/vars.sh
  83.  
  84. # Define LSB log_* functions.
  85. # Depend on lsb-base (>= 3.2-14) to ensure that this file is present
  86. # and status_of_proc is working.
  87. . /lib/lsb/init-functions
  88.  
  89. get_vm_state()
  90. {
  91.    # possible SHORT_STATE values: running, paused, aborted, powered off
  92.  
  93.    VMINFO=$($SUDO_CMD $MANAGE_CMD showvminfo "$VM_LONG_NAME" 2>/dev/null)
  94.    if [ $? = 0 ] ; then
  95.        # No error retriving state string
  96.        LONG_STATE=$(echo "$VMINFO"|grep --max-count=1 "^State:"|cut --delimiter=' ' \
  97.            --fields=2-|sed 's/^ *//')
  98.        SHORT_STATE=$(echo $LONG_STATE|cut --delimiter="(" --fields=1|sed 's/ *$//')
  99.        # Fix for syntax highlighting in KomodoEdit for previous line
  100.        [ 0 = 1 ] && NOOP=$(echo ")")
  101.    else
  102.        # VM must be missing
  103.        LONG_STATE=missing
  104.        SHORT_STATE=missing
  105.    fi
  106. }
  107.  
  108. do_start()
  109. {
  110.    # Return
  111.    #   0 if daemon has been started
  112.    #   1 if daemon was already running
  113.    #   2 if daemon could not be started
  114.  
  115.    get_vm_state
  116.  
  117.    if [ "$SHORT_STATE" = "missing" ] ; then
  118.        echo Could not access VM \"$VM_LONG_NAME\".
  119.        return 2
  120.    fi
  121.  
  122.    if [ "$SHORT_STATE" = "running" ] ; then
  123.        echo VM \"$VM_LONG_NAME\" is already running.
  124.        return 1
  125.    fi
  126.  
  127.    $SUDO_CMD $MANAGE_CMD startvm "$VM_LONG_NAME" -type vrdp || {
  128.        echo Failed to start VM \"$VM_LONG_NAME\".
  129.        return 2
  130.    }
  131.  
  132.    # No status report; VBoxManage said if it worked.
  133.    return 0
  134. }
  135.  
  136. do_stop()
  137. {
  138.    # Return
  139.    #   0 if daemon has been stopped
  140.    #   1 if daemon was already stopped
  141.    #   2 if daemon could not be stopped
  142.    #   other if a failure occurred
  143.  
  144.    get_vm_state
  145.  
  146.    if [ "$SHORT_STATE" = "missing" ] ; then
  147.        echo Could not access VM \"$VM_LONG_NAME\".
  148.        return 3
  149.    fi
  150.  
  151.    if [ ! "$SHORT_STATE" = "running" ] ; then
  152.        echo VM \"$VM_LONG_NAME\" is already stopped.
  153.        return 1
  154.    fi
  155.  
  156.    $SUDO_CMD $MANAGE_CMD controlvm "$VM_LONG_NAME" $VM_STOP_CMD || {
  157.        echo Failed to hibernate VM \"$VM_LONG_NAME\".
  158.        return 2
  159.    }
  160.  
  161.    echo Waiting for \"$VM_LONG_NAME\" to complete shutdown...
  162.    while [ "$SHORT_STATE" = "running" ] ; do
  163.        sleep 1
  164.        get_vm_state
  165.    done
  166.  
  167.    echo The VM \"$VM_LONG_NAME\" has been stopped \($VM_STOP\).
  168.    return 0
  169. }
  170.  
  171. do_status()
  172. {
  173.    get_vm_state
  174.    if [ "$SHORT_STATE" = "missing" ] ; then
  175.        echo Could not access VM \"$VM_LONG_NAME\".
  176.        return 2
  177.    fi
  178.    echo Status of VM \"$VM_LONG_NAME\": $LONG_STATE
  179.  
  180.    if [ "$SHORT_STATE" = "running" ] ; then return 1 ; else return 0 ; fi
  181. }
  182.  
  183. do_reload() {
  184.    VM_STOP=powerbutton
  185.    VM_STOP_CMD=acpipowerbutton
  186.    do_stop && do_start
  187. }
  188.  
  189. do_wait_for_online() {
  190.    echo Waiting for \"$VM_LONG_NAME\" to come up on the network...
  191.    while [ ! "$result" = "0" ] ; do
  192.        sleep 1
  193.        ping -c 1 $VM_HOSTNAME >/dev/null 2>/dev/null
  194.        result=$?
  195.    done
  196.    echo Ready.
  197. }
  198.  
  199. case "$1" in
  200.  start)
  201.    [ "$VERBOSE" != no ] && log_daemon_msg "Starting $DESC" "$NAME"
  202.    do_start
  203.    case "$?" in
  204.        0|1) [ "$VERBOSE" != no ] && log_end_msg 0 ;;
  205.        2) [ "$VERBOSE" != no ] && log_end_msg 1 ;;
  206.    esac
  207.    ;;
  208.  start-wait)
  209.    do_start && do_wait_for_online
  210.    ;;
  211.  stop)
  212.    [ "$VERBOSE" != no ] && log_daemon_msg "Stopping $DESC" "$NAME"
  213.    do_stop
  214.    case "$?" in
  215.        0|1) [ "$VERBOSE" != no ] && log_end_msg 0 ;;
  216.        2) [ "$VERBOSE" != no ] && log_end_msg 1 ;;
  217.    esac
  218.    ;;
  219.  status)
  220.    do_status && exit 0 || exit $?
  221.    ;;
  222.  restart|force-reload)
  223.    #
  224.    # If the "reload" option is implemented then remove the
  225.    # 'force-reload' alias
  226.    #
  227.    [ "$VERBOSE" != no ] && log_daemon_msg "Restarting $DESC" "$NAME"
  228.    VM_STOP=powerbutton
  229.    VM_STOP_CMD=acpipowerbutton
  230.    do_stop
  231.    case "$?" in
  232.      0|1)
  233.        do_start
  234.        case "$?" in
  235.            0) [ "$VERBOSE" != no ] && log_end_msg 0 ;;
  236.            1) [ "$VERBOSE" != no ] && log_end_msg 1 ;; # Old process is still running
  237.            *) [ "$VERBOSE" != no ] && log_end_msg 1 ;; # Failed to start
  238.        esac
  239.        ;;
  240.      *)
  241.        # Failed to stop
  242.        [ "$VERBOSE" != no ] && log_end_msg 1
  243.        ;;
  244.    esac
  245.    ;;
  246.  restart-wait)
  247.    VM_STOP=poweroff
  248.    VM_STOP_CMD=acpipowerbutton
  249.    do_stop
  250.    do_start && do_wait_for_online
  251.    ;;
  252.  *)
  253.    echo "Usage: $SCRIPTNAME {start|start-wait|stop|status|restart|restart-wait|force-reload}" >&2
  254.    exit 3
  255.    ;;
  256. esac
  257.  
  258. :
  259.  
  260.  

4.ทดสอบ script (chmod u+x ก่อน) by use command in terminal "chmod u+x /etc/init.d/vbox-Name"
/etc/init.d/vbox-NAME status # Is the VM running?
/etc/init.d/vbox-NAME start # Start the VM
/etc/inid.d/vbox-NAME stop # Stop the VM

5.ติดตั้ง script ให้ทำงานทุกครั้งตอน boot
sudo update-rc.d vbox-NAME defaults 90
Last edited by Suwit_J on Tue 11/09/2012 13:53:50, edited 1 time in total.