Showing posts with label Ubuntu. Show all posts

9/23/2025

Ubuntu 18.04 Samba share เข้า terminal ภาษาไทยไม่แสดง

 Ubuntu 18.04 Samba share เข้า terminal ภาษาไทยไม่แสดง

ตั้งตั้งค่า locales
1. คำสั่ง

  1. dpkg-reconfigure locales

2. เลือก
th_TH.UTF-8 UTF-8


5/19/2025

rsync ข้อมูลจากเครื่อง 1 ไปอีกเครื่อง 1 ใน Ubuntu

 ที่เครื่อง X1 ที่ต้องการเอาข้อมูล
1. แก้ไฟล์ sshd_config

  1. nano /etc/ssh/sshd_config

เพิ่ม
PermitRootLogin yes

และใส่ # ไม่ใช้งานหน้า
#PermitRootLogin prohibit-password
#StrictModes yes

restart service
systemctl restart sshd

ที่เครื่องใหม่ X2
2. ทดลอง ssh ด้วย user root ว่าเข้าไปที่ X1 ได้หรือไม่
3. คำสั่ง
ทดลอง
  1. rsync -aAXv -e "ssh -p 22" root@IP_X1:/DATA/e-document/#2025#/* /DATA/e-document/#2025#/

ถ้าจะทำจริง ๆ
  1. rsync -aAXv -e "ssh -p 22" root@IP_X1:/DATA/e-document/* /DATA/e-document/
ไม่ต้องใส่ --numeric-ids เพราะจะทำให้ group ได้ไม่ตรงกัน เนื่องจาก id ของเครื่องเก่าและใหม่ไม่ตรงกัน

ตรวจสอบสิทธิ์ ด้วย ls -la ว่า group และสิทธิ์ ถูกต้องหรือไม่
ls -la /DATA/e-document/#2025#/001-099/SO25-001/

symbolic-link Ubuntu

 ให้รูปจาก Datacenter ดึงมาแสดงใน Intranet โดยการสร้าง symbolic-link
ใช้คำสั่ง

  1. ln -s /DATA/Asset/ /var/www/

จะได้
  1. ls -la
  2. lrwxrwxrwx  1 root root   12 May 14 10:15 Asset -> /DATA/Asset/

คำอธิบาย
ln -s /ปลายทางของไฟล์ที่จะ link ไป/ /ที่อยู่ของ link/

5/15/2025

Windows Server 2003 Active Directory (AD) ใช้กับ Ubuntu Join domain ได้สูงสุด

 Windows Server 2003 Active Directory (AD) ใช้กับ Ubuntu เพื่อ join domain ได้ จำกัดอยู่ที่บางเวอร์ชันของ Ubuntu เท่านั้น เนื่องจาก Windows Server 2003 ใช้ SMB1 และ LDAP แบบเก่า ซึ่งถูกเลิกสนับสนุนในเวอร์ชัน Ubuntu ที่ใหม่กว่าเพื่อความปลอดภัย
Ubuntu เวอร์ชันที่ยังสามารถ join domain กับ Windows Server 2003 ได้ (โดยทั่วไป):

- Ubuntu 12.04 LTS
- Ubuntu 14.04 LTS
- Ubuntu 16.04 LTS (อาจต้องปรับแต่งเพิ่มเติม)

Ubuntu 18.04 ขึ้นไป เริ่มมีปัญหาเข้ากันไม่ได้โดยตรงกับ Windows Server 2003 AD เพราะ:
Ubuntu ใช้ Samba 4 ที่ตั้งค่าเริ่มต้นปิด SMB1
LDAP/NTLMv1 ถูกปิด ระบบความปลอดภัยและการเข้ารหัสมีการปรับให้รัดกุมขึ้น

ถ้าต้องใช้ Ubuntu ที่ใหม่กว่า:
ยังสามารถ พยายาม join domain ได้โดยการบังคับให้เปิด SMB1 และ NTLMv1 เช่น:
ปรับ smb.conf ให้รองรับ SMB1 (client min protocol = NT1)
แก้ krb5.conf และ nsswitch.conf ให้รองรับ Kerberos แบบเก่า
แต่ ไม่แนะนำอย่างยิ่ง ใน production เนื่องจากความเสี่ยงด้านความปลอดภัย

สรุป:
Ubuntu ที่แนะนำสุดท้ายสำหรับใช้งานร่วมกับ Windows Server 2003 AD คือ Ubuntu 16.04 LTS
เวอร์ชันใหม่กว่านั้นอาจทำงานไม่ได้เลยหรือทำได้แต่ต้องปรับแต่งเสี่ยง

6/22/2024

Ubuntu คำสั่งหา File ที่ซ้ำกัน ข้อมูลซ้ำกัน


Ubuntu คำสั่งหา File ที่ซ้ำกัน ข้อมูลซ้ำกัน
ด้วยโปรแกรม fdupes
https://itsfoss.com/find-duplicate-files-linux/

ติดตั้งโปรแกรมด้วยคำสั่ง
  1. sudo apt install fdupes

ใช้งาน
  1. fdupes /path/to/folder

เช่น
  1. fdupes -r /home

หรือเข้าไปที่ Folder ที่ต้องการก่อน
  1. fdupes -r . > fdupes.text

เช่น


6/21/2024

Ubuntu คำสั่ง Scan ดูขนาดพื้นที่แต่ละ Folder ด้วยโปรแกรม ncdu

 Ubuntu คำสั่ง Scan ดูขนาดพื้นที่แต่ละ Folder ด้วยโปรแกรม ncdu
ติดตั้งโปรแกรม
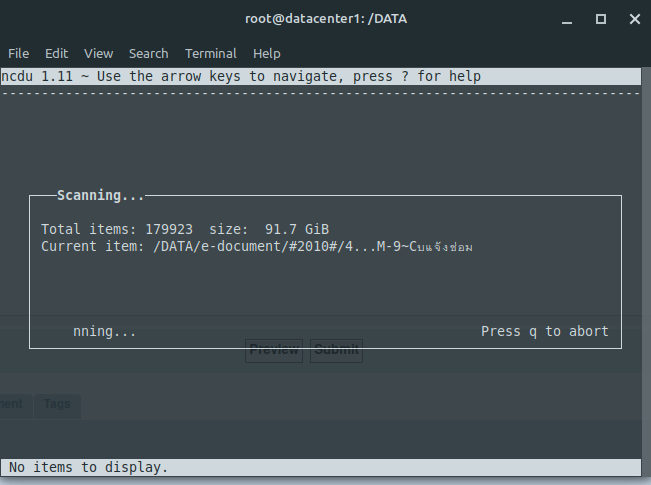
  1. apt install ncdu


เข้าไปใน Folder ที่ต้องการ Scan ดูข้อมูล เช่น datacenter
  1. cd /DATA


Run Program
  1. ncdu .
ใช้ลูกศรเลื่อนเข้าออก ขึ้นลง เพื่อดูข้อมูล

3/06/2024

Alfresco มีปัญหา Load CPU เยอะค้นหาไม่ได้ Error

Alfresco มีปัญหา Run CPU เยอะค้นหาไม่ได้ Error
แก้ปัญหาโดย
ใช้วิธีตั้ง Crontab ให้ Restart service ตอน 8.40 น. แต่บางวันก็ต้อง Restart Manual อีกรอบ เป็นทุกวันตอนเช้า หลังจาก Restart ไป ก็ใช้งานได้ทั้งวันและจะเป็นอีกทีในตอนเช้าของวันต่อไป
Error ค้นหาไฟล์ไม่พบ

search failed due to system error: 0822154976 request failed 500 /solr/alfresco/alfresco?wt=json&fl=dbid%2cscore&rows=500&df=text&start=0&locale=en_us&fq=%7b%21afts%7dauthority_filter_from_json&fq=%7b%21afts%7dtenant_filter_from_json

ส่งผลให้ กิน CPU ที่ตัว Server Alfresco และตัว VMware

มี Process JAVA run CPU สูงผิดปกติ

Process บางตัว Run เป็นเวลานาน กว่า Process อื่น ๆ
USER PID %CPU %MEM VSZ RSS TTY STAT START TIME COMMAND
root 3703 52.5 18.7 2161208 1533760 ? Sl Mar05 372:14 /DATA/alfresco/java/bin/java -Djava.util.logging.config.file=/DATA/alfresco/tomcat/conf/logging.properties -XX:MaxPermSize=512m -Xms128m -Xmx1024m -XX:-DisableExplicitGC -D

เมื่อ Restart service Alfresco process นี้จะเริ่ม Run ใหม่
ทดลองวันที่ 20240306
แก้ปัญหาโดย
แก้ไฟล์ ctl.sh เพิ่ม MaxPermSize , Xms, Xmx
nano /DATA/alfresco/tomcat/scripts/ctl.sh
เดิม
#export JAVA_OPTS="-XX:MaxPermSize=512m -Xms128m -Xmx1024m -XX:-DisableExplicitGC -Djava.awt.headless=true -Dalfresco.home=/DATA/alfresco -Dcom.sun.management.jmxremote -Dsun.security.ssl.allowUnsafeRenegotiation=true"
แก้ใหม่
export JAVA_OPTS="-XX:MaxPermSize=1024m -Xms512m -Xmx2048m -XX:-DisableExplicitGC -Djava.awt.headless=true -Dalfresco.home=/DATA/alfresco -Dcom.sun.management.jmxremote -Dsun.security.ssl.allowUnsafeRenegotiation=true"
และ
เดิม
#export JAVA_OPTS="-XX:MaxPermSize=512m -Xms128m -Xmx1024m -XX:-DisableExplicitGC -Djava.awt.headless=true -Dalfresco.home=/DATA/alfresco -Dcom.sun.management.jmxremote -Dsun.security.ssl.allowUnsafeRenegotiation=true"
แก้ใหม่
export JAVA_OPTS="-XX:MaxPermSize=1024m -Xms512m -Xmx2048m -XX:-DisableExplicitGC -Djava.awt.headless=true -Dalfresco.home=/DATA/alfresco -Dcom.sun.management.jmxremote -Dsun.security.ssl.allowUnsafeRenegotiation=true"


กลับไปใช้ Crontab restart ทุกเช้า 5.30 น. เหมือนเดิม

https://hub.alfresco.com/t5/alfresco-content-services-forum/java-heap-space-issue-on-solr4/m-p/57364#M3201

12/25/2023

Ping Check Internet Switch Network Notification Line.

Ping Check Internet Switch Network Notification Line.

1. ใช้งานที่ เครื่อง VMware .2.99
1.1.ลากสายจาก Router wifi Fttx เข้า VMware
1.2.ตั้งค่า Virtual switches ชื่อ FttxWifi
1.3.ตั้งค่า Add port group ชื่อ FttxWifi

2. ติดตั้ง 22.04 add network 2 Adapter
- วง 2 DMZ
- และ FTTX รับ DHCP จาก FttxWifi
- update upgrade ตั้ง Time zone
set-timezone Asia/Bangkok

3. config ip
nano /etc/netplan/00-installer-config.yaml

network:
ethernets:
ens160: # Fix .2
dhcp4: false
addresses: [192.168.2.8/24]
nameservers:
addresses: [192.168.2.2,8.8.8.8]
routes:
- to: default
via: 192.168.2.2
ens192: # DHCP form fttx TOT.
dhcp4: true
version: 2


3.1. fix ip .2
3.2. fttx รับ DHCP จาก FttxWifi Network (ข้อ 1.3)

4. นำไปใช้ด้วยคำสั่ง หรือ reboot เครื่อง
netplan apply

5. ตรวจเช็ค IP ดูว่าได้ IP ทั้งสองหรือไม่
ifconfig


(ขั้นตอนนี้อาจจะไม่ได้ใช้งาน)
ติดตั้ง network-manager แล้ว Reboot เครื่อง
apt-get install network-manager

6. Code เช็ค และแจ้งเตือน XXXXXXXXXX คือ ID ของ Line ที่ต้องการส่งเข้า
CheckNet.sh
  1. #!/bin/bash
  2.         ping -c 1 -t 116 http://www.google.com
  3.         if [[ "$?" == "1" ]] # 1 is internet is down.
  4.         then
  5.                 # Net fttx down. change up to .2
  6.                 ifconfig ens160 up  # .2
  7.                 ifconfig ens192 down # fttx
  8.                 sleep 5 # Wait switch network.
  9.                
  10.                 ################## Test To Line ###############################
  11.                 #curl -X POST -H 'Authorization: Bearer XXXXXXXXXX' -F 'message=Internet FTTX down.Please check! From IP 192.168.2.8' https://notify-api.line.me/api/notify
  12.                 ################## To It Group ################################
  13.                 curl -X POST -H 'Authorization: Bearer XXXXXXXXXX' -F 'message=Internet FTTX down.Please check! From IP 192.168.2.8' https://notify-api.line.me/api/notify
  14.         #else
  15.                 # Net fttx up. down .2
  16.                 #ifconfig ens192 up  # fttx
  17.                 #ifconfig ens160 down # .2
  18.         fi
  19.  

7. Code เมื่อตรวจสอบเสร็จแล้วกลับไปใช้ Network FttxWifi
  1. SwitchToFttx.sh
  2. #!/bin/bash
  3.         # Net fttx up. down .2
  4.         ifconfig ens192 up  # fttx
  5.         ifconfig ens160 down # .2


8. Code สำหรับปิด DMZ เพื่อให้ใช้งาน FttxWifi
DownDMZ.sh
  1. #!/bin/bash
  2.         ifconfig ens160 down # .2


9. ใส่ ไว้ใน cron เพื่อให้ทำตอนเปิดเครื่อง
crontab -e เมื่อเปิดเครื่องให้ปิด DMZ เพื่อใช้ Network FttxWifi.
#Down DMZ Network When Start.
@reboot /home/sa/DownDMZ.sh

#Check internet Fttx Wifi.
5 8-18 * * 1-6 bash /home/sa/CheckNet.sh

# 1 Hour switch to fttx wifi disable dmz. For check Fttx again.
0 8-18 * * 1-6 bash /home/sa/SwitchToFttx.sh


การทำงาน
1. เปิดเครื่อง ปิด Network .2 เปิดใช้เฉพาะ FTTX
2. เช็ค Ping ทุก 5 นาที วันจันทร์ - เสาร์ เวลา 8 - 18 น. ถ้า เน็ตเสีย ปิด Network FTTX เปิด Network .2 เพื่อส่งแจ้งเตือนทาง Line คำสั่ง Check
bash CheckNet.sh
เมื่อได้รับเตือนต้องเข้าเช็ค ว่า Fttx เสียหรือไม่ ถ้าเช็ค Fttx ใช้งานได้แล้ว ให้ Run คำสั่ง
bash SwitchToFttx.sh
เพื่อกลับไปใช้ Network Fttx และปิด Network .2
3. กรณีไม่ได้เข้าเช็ครออีก 1 ชั่วโมง จะทำ Auto Switch
bash SwitchToFttx.sh
เพื่อกลับไปใช้เน็ต FTTX ปิดวง .2
และเช็คซ้ำอีกครั้งและแจ้งเตือนถ้าเน็ต Fttx ยังเสียอยู่

9/25/2023

linux mint : ไม่สามารถ SSH ไปบางเครื่องได้

linux mint : ไม่สามารถ SSH ไปบางเครื่องได้

root@OD-SUWIT:/home/suwit_j# ssh sa@192.168.2.104
Unable to negotiate with 192.168.2.104 port 22: no matching host key type found. Their offer: ssh-rsa,ssh-dss


วิธีแก้

1. สร้างไฟล์
  1. nano /etc/ssh/ssh_config.d/my.conf

2. เอาข้อมูลนี้ไปใส่
  1. HostKeyAlgorithms ssh-rsa,ssh-dss
  2. PubkeyAcceptedKeyTypes ssh-rsa,ssh-dss
  3.  
https://askubuntu.com/questions/836048/ssh-returns-no-matching-host-key-type-found-their-offer-ssh-dss

แล้วลอง SSH ดู มันจะให้ลบ key เดิมที่เคยบันทึกไว้ออก ด้วยคำสั่ง
ssh-keygen -f "/home/suwit_j/.ssh/known_hosts" -R "192.168.2.104"


9/05/2022

ubuntu 22.04 Set IP


ubuntu 22.04 Set IP
1. check name card
  1. sudo ip a

2. แก้ไฟล์
/etc/netplan/00-network-manager-all.yaml

3. แก้ไฟล์ดังนี้  enp0s3 คือได้จากข้อ 1.
  1. network:
  2.     ethernets:
  3.         enp0s3:
  4.             dhcp4: false
  5.             addresses: [192.168.2.1/24]
  6.             gateway4: 192.168.2.2
  7.             nameservers:
  8.               addresses: [8.8.8.8,8.8.4.4,192.168.2.2]
  9.     version: 2

4. ใช้คำสั่ง
  1. sudo netplan apply

3/18/2021

ติดตั้ง Windows และ Linux ใน HDD ก้อนเดียว

ติดตั้ง Windows และ Linux ใน HDD ก้อนเดียว Bios ทำเป็น UEFI HDD เป็น GPT
1. ติดตั้ง Windows ทำ Data เป็น NTFS ไว้สำหรับใช้ร่วมกัน Ubuntu กับ Windows
2. ติดตั้ง Ubuntu ลง
HDD Windows 100G Ntfs
HDD DATA 350G Ntfs ใช้ร่วมกัน
HDDUbuntu 40G Ext4

ใช้ได้เลยมี Grub ของ Ubuntu ได้ให้ใช้ได้เลย เพราะ Linux, Ubuntu จะสร้าง Group ให้

หรือ ให้มี Menu ให้เลือกสวยงามให้ใช้
https://www.rodsbooks.com/refind/installing.html
วิธีติดตั้ง
sudo apt-add-repository ppa:rodsmith/refind
sudo apt-get update
sudo apt-get install refind
refind-install
reboot

เข้า bios ตั้งตัว Boot หลัก ให้เป็นตัวที่ไม่ใช่ Ubuntu หรือ Windows ก็จะเข้าหน้า Refind ได้
อันไหนไม่เอา ดูที่หน้า Refind มันจะมี Path อยู่ว่ามันเจออยู่ที่ไหน เข้า Ubuntu ไปลบทิ้ง ก็จะเหลือที่เราจะใช้เท่านั้น
Path Config อยู่ที่
/boot/efi/EFI/refind/refind.config

ใส่ Disabled ในอันที่ไม่ต้องการให้แสดง ใส่ yes ให้แสดง

3/03/2021

Ubutun : Terminal แตกไฟล์เอาเฉพาะไฟล์ที่ต้องการ

 Ubutun : Terminal แตกไฟล์เอาเฉพาะไฟล์ที่ต้องการ

วิธีนี้แตกเฉพาะไฟล์ที่ต้องการ
https://askubuntu.com/questions/168795/ ... ar-archive

เช่น ตัวอย่างไฟล์ zip ตามแนบ
คำสั่ง เช่น

tar -xf Test.tar.gz Test/123/456/ฝบง./hostneverdie.pdf
tar -xf Test.tar.gz Test/123/456/77.txt
ก็จะได้เฉพาะไฟล์ที่ต้องการ แต่ Path ที่อยู่ของไฟล์จะแตกตามเดิม จะได้รู้ว่าไฟล์อยู่ที่ไหน


7/08/2020

Datacenter ขยาย Partition Disk ได้แค่ 2 TB

Datacenter ขยาย Partition Disk ได้แค่ 2 TB
นำ Disk ไปขยาย Partition แล้ว Error ขยายไม่ได้
libparted messages (ERROR)
partition length of เลขขนาดที่ต้องการขยาย sectors exceeds the msdos-partition-table-imposed maximum of เลขขนาดที่ Disk รับได้

เนื่องจาก Disk ของ Datacenter เป็น ชนิด MBR จึงได้ขนาดสูงสุดแค่ 2 TB ทำให้เกิด Error ดังกล่าว
วิธีเช็คว่า Disk เป็น MBR หรือ GPT
1. ติดตั้ง gdisk
  1. apt-get install gdisk

2. ใช้คำสั่ง
gdisk -l /dev/XXX dev ที่ต้องการ เช่น
  1. gdisk -l /dev/sdc

6/26/2020

Ubuntu : Ubuntu resolv.conf nameserver เปลี่ยน

Ubuntu : Ubuntu resolv.conf nameserver เปลี่ยน ทำให้ออกเน็ตไม่ได้
ค่าเดิม
nameserver 127.0.0.53

วิธีแก้
# Use Google's public DNS servers.
nameserver 8.8.4.4
nameserver 8.8.8.8


But things change and now it’s not that simple. If you now edit /etc/resolv.conf on Ubuntu you’ll find that the edits are ephemeral. If you restart (or even hibernate) your machine then they’ll be overwritten by default content.

nameserver 127.0.0.53
search Home


This is pretty simple to fix though.
1.Install the resolvconf package.
  1. sudo apt install resolvconf


2. Edit /etc/resolvconf/resolv.conf.d/head and add the following:
  1. # Make edits to /etc/resolvconf/resolv.conf.d/head.
  2. nameserver 8.8.4.4
  3. nameserver 8.8.8.8


3. Restart the resolvconf service.
  1. /etc/init.d/resolvconf restart

Fix should be permanent.
https://datawookie.netlify.app/blog/2018/10/dns-on-ubuntu-18.04/

4/10/2020

Ubuntu :: Ubuntu Scan Virus ClamAV

Ubuntu :: Ubuntu Scan Virus ClamAV
https://www.howtoforge.com/tutorial/clamav-ubuntu/

1. ติดตั้ง
  1. sudo apt-get install clamav

2. Update
  1. sudo freshclam

3. Scan Folder ข้อมูลเล็กน้อย (ไม่เก็บ Log แสดงไฟล์ที่ติด Virus ให้ดู)
  1. clamscan -r --bell -i /home/bill/Downloads


แต่ถ้า Scan Folder ที่ข้อมูลเยอะ ๆ Log จะถูกทับ ไม่เห็นข้อมูลต้อง สั่งแบบเก็บ Log
  1. clamscan -r --bell -i /DATA2/Software/ >> /var/log/clamav-scan.log


ถึงจะดู Log ทั้งหมดได้ที่ไฟล์ /var/log/clamav-scan.log
https://askubuntu.com/questions/19699/how-to-view-results-of-last-clamscan-scan

11/26/2019

Ubuntu : Ubuntu 18.04 Https Free letsencrypt

Ubuntu : Ubuntu 18.04 Https Free letsencrypt
ที่ต้องมี
1. เครื่องที่จะทำต้องออก Net ได้ เพื่อ Check DNS ข้างนอก
2. ต้องมี Domain ที่ตรวจสอบจาก DNS ข้างนอกได้ เช็คได้ที่
https://check-your-website.server-daten.de/
ถ้าไม่มีจะ Error
root@intranet1804:~# certbot-auto certonly --standalone -d intranettest.sci.com -d www.intranettest.sci.com
Saving debug log to /var/log/letsencrypt/letsencrypt.log
Plugins selected: Authenticator standalone, Installer None
Obtaining a new certificate
Performing the following challenges:
http-01 challenge for intranettest.sci.com
http-01 challenge for www.intranettest.sci.com

Waiting for verification...
Challenge failed for domain intranettest.sci.com
Challenge failed for domain www.intranettest.sci.com
http-01 challenge for intranettest.sci.com
http-01 challenge for www.intranettest.sci.com
Cleaning up challenges
Some challenges have failed.

IMPORTANT NOTES:
- The following errors were reported by the server:

Domain: intranettest.sci.com
Type: dns
Detail: DNS problem: NXDOMAIN looking up A for intranettest.sci.com

Domain: www.intranettest.sci.com
Type: dns
Detail: DNS problem: NXDOMAIN looking up A for
www.intranettest.sci.com
3. Stop apace ก่อน Run Code ไม่อย่างนั้นจะ Error
Obtaining a new certificate
Performing the following challenges:
http-01 challenge for intranettest.com
http-01 challenge for www.intranettest.com
Cleaning up challenges
Problem binding to port 80: Could not bind to IPv4 or IPv6.

IMPORTANT NOTES:
- Your account credentials have been saved in your Certbot
configuration directory at /etc/letsencrypt. You should make a
secure backup of this folder now. This configuration directory will
also contain certificates and private keys obtained by Certbot so
making regular backups of this folder is ideal.

เริ่มติดตั้ง letsencrypt


Step 1 – Prerequisites
Before starting work on this task, I assume you already have:

- Running Ubuntu system with sudo privileges shell access.
- A domain name registered and pointed to your server’s public IP address. For this tutorial, we use example.com and www.example.com, which is pointed to our server.
- Running web server with VirtualHost configured for example.com and www.example.com on Port 80.

Step 2 – Install Let’s Encrypt Client


Download the certbot-auto Let’s Encrypt client and save under /usr/sbin directory. Use the following command to do this.
  1. sudo wget https://dl.eff.org/certbot-auto -O /usr/sbin/certbot-auto
  2. sudo chmod a+x /usr/sbin/certbot-auto

Step 3 – Get a SSL Certificate

Let’s Encrypt do a strong Domain Validation automatically with multiple challenges to verify the ownership of the domain. Once the Certificate Authority (CA) verified the authenticity of your domain, SSL certificate will be issued.
  1. sudo certbot-auto certonly --standalone -d example.com  -d www.example.com

Above command will prompt for an email address, which is used for sending email alerts related to SSL renewal and expiration. Also, asks a few more questions. After completion, it will issue an SSL certificate and will also create a new VirtualHost configuration file on your system.

Step 4 – Check SSL Certificate

If everything goes fine. A new ssl will be issued at below location. Navigate to below directory and view files.
  1. cd /etc/letsencrypt/live/example.com
  2. ls

Files List:
cert.pem
chain.pem
fullchain.pem
privkey.pem

Setp 5 – Configure SSL VirtualHost

Use the following configurations for Apache and Nginx web server. Edit virtual host configuration file and add below entries for the certificate.

Apache:
SSLEngine on
SSLCertificateFile /etc/letsencrypt/live/example.com/cert.pem
SSLCertificateKeyFile /etc/letsencrypt/live/example.com/privkey.pem
SSLCertificateChainFile /etc/letsencrypt/live/example.com/chain.pem


Step 6 – Configure SSL Auto Renew


In the end, configure the following job on your server crontab to auto-renew SSL certificate if required.

  1. 0 6 30 * * sudo /usr/sbin/certbot-auto -q renew

หรือ
  1. 0 6 30 * * certbot renew --dry-run


Step 7 นำไฟล์ไปใช้ ที่ 000-default.conf
เช่น
<VirtualHost *:80>
ServerName extranet.scivalve.com
Redirect / https://extranet.scivalve.com/
ServerAdmin suwit@scivalve.com
RewriteEngine on
RewriteCond %{SERVER_NAME} =extranet.scivalve.com
RewriteRule ^ https://%{SERVER_NAME}%{REQUEST_URI} [END,NE,R=permanent]
</VirtualHost>

<VirtualHost *:443>
ServerName extranet.scivalve.com
DocumentRoot /var/www/extranet
SSLEngine on
ServerAdmin suwit@scivalve.com
<Directory /var/www/extranet/>
Options Indexes FollowSymLinks MultiViews
AllowOverride None
Order allow,deny
allow from all
</Directory>
SSLCertificateFile /etc/letsencrypt/live/extranet.scivalve.com/fullchain.pem
SSLCertificateKeyFile /etc/letsencrypt/live/extranet.scivalve.com/privkey.pem
Include /etc/letsencrypt/options-ssl-apache.conf
</VirtualHost>

https://tecadmin.net/install-lets-encrypt-create-ssl-ubuntu/

11/25/2019

Ubuntu : Ubuntu 18.04 Add Harddisk From Vmware

Ubuntu : Ubuntu 18.04 Add Harddisk From Vmware
1. Add disk edit Vmware
2. Check disk all root@intranet-test:~#
  1. fdisk -l 
Disk /dev/loop0: 88.5 MiB, 92778496 bytes, 181208 sectors
Units: sectors of 1 * 512 = 512 bytes
Sector size (logical/physical): 512 bytes / 512 bytes
I/O size (minimum/optimal): 512 bytes / 512 bytes

Disk /dev/sda: 50 GiB, 53687091200 bytes, 104857600 sectors
Units: sectors of 1 * 512 = 512 bytes
Sector size (logical/physical): 512 bytes / 512 bytes
I/O size (minimum/optimal): 512 bytes / 512 bytes
Disklabel type: gpt
Disk identifier: 43516ABD-068C-45F5-BC44-9BBBBAD0D4D2

Device Start End Sectors Size Type
/dev/sda1 2048 4095 2048 1M BIOS boot
/dev/sda2 4096 104855551 104851456 50G Linux filesystem

Disk /dev/sdb: 150 GiB, 161061273600 bytes, 314572800 sectors
Units: sectors of 1 * 512 = 512 bytes
Sector size (logical/physical): 512 bytes / 512 bytes
I/O size (minimum/optimal): 512 bytes / 512 bytes

3. Create disk
root@intranet-test:~#
  1. fdisk /dev/sdb
Welcome to fdisk (util-linux 2.31.1).
Changes will remain in memory only, until you decide to write them.
Be careful before using the write command.

The old ext4 signature will be removed by a write command.

Device does not contain a recognized partition table.
Created a new DOS disklabel with disk identifier 0xbd682c0d.

Command (m for help): n
Partition type
p primary (0 primary, 0 extended, 4 free)
e extended (container for logical partitions)
Select (default p): p
Partition number (1-4, default 1): #Enter
First sector (2048-314572799, default 2048): #Enter
Last sector, +sectors or +size{K,M,G,T,P} (2048-314572799, default 314572799):

Created a new partition 1 of type 'Linux' and of size 150 GiB.

Command (m for help): w
The partition table has been altered.
Calling ioctl() to re-read partition table.
Syncing disks.

4. Convertor disk to ext4
  1. sudo mkfs -t ext4 /dev/sdb1
mke2fs 1.44.1 (24-Mar-2018)
Creating filesystem with 39321344 4k blocks and 9830400 inodes
Filesystem UUID: bf8171ec-a497-4ad8-80a0-aef19903721f
Superblock backups stored on blocks:
32768, 98304, 163840, 229376, 294912, 819200, 884736, 1605632, 2654208,
4096000, 7962624, 11239424, 20480000, 23887872

Allocating group tables: done
Writing inode tables: done
Creating journal (262144 blocks): done
Writing superblocks and filesystem accounting information: done
5 ดู Disk
  1. fdisk -l
Disk /dev/loop0: 88.5 MiB, 92778496 bytes, 181208 sectors
Units: sectors of 1 * 512 = 512 bytes
Sector size (logical/physical): 512 bytes / 512 bytes
I/O size (minimum/optimal): 512 bytes / 512 bytes

Disk /dev/sda: 50 GiB, 53687091200 bytes, 104857600 sectors
Units: sectors of 1 * 512 = 512 bytes
Sector size (logical/physical): 512 bytes / 512 bytes
I/O size (minimum/optimal): 512 bytes / 512 bytes
Disklabel type: gpt
Disk identifier: 43516ABD-068C-45F5-BC44-9BBBBAD0D4D2

Device Start End Sectors Size Type
/dev/sda1 2048 4095 2048 1M BIOS boot
/dev/sda2 4096 104855551 104851456 50G Linux filesystem

Disk /dev/sdb: 150 GiB, 161061273600 bytes, 314572800 sectors
Units: sectors of 1 * 512 = 512 bytes
Sector size (logical/physical): 512 bytes / 512 bytes
I/O size (minimum/optimal): 512 bytes / 512 bytes
Disklabel type: dos
Disk identifier: 0xbd682c0d

Device Boot Start End Sectors Size Id Type
/dev/sdb1 2048 314572799 314570752 150G 83 Linux
6. ดู uuid เพื่อเอาไปใส่ใน fstab
  1. ls -al /dev/disk/by-uuid/

7. เพิ่ม uuid ใน fstab เพื่อให้ mount auto เมื่อเปิดเครื่อง
  1. nano /etc/fstab
UUID=bf8171ec-a497-4ad8-80a0-aef19903721f /www ext4 defaults 0 0
8. สร้าง Folder ที่จะ mount ไป ใน
  1. mkdir /www

9. reboot เครื่อง
10. Check ว่า disk ถูก Mount เรียบร้อย
  1. df -h
Filesystem Size Used Avail Use% Mounted on
udev 1.9G 0 1.9G 0% /dev
tmpfs 395M 1.1M 394M 1% /run
/dev/sda2 49G 5.8G 41G 13% /
tmpfs 2.0G 0 2.0G 0% /dev/shm
tmpfs 5.0M 0 5.0M 0% /run/lock
tmpfs 2.0G 0 2.0G 0% /sys/fs/cgroup
/dev/loop0 89M 89M 0 100% /snap/core/7270
/dev/sdb1 147G 61M 140G 1% /www
tmpfs 395M 0 395M 0% /run/user/1000
https://oxyme.wordpress.com/2018/08/29/add-install-a-new-hdd-on-ubuntu-18-04-lts-server-edition/

10/28/2019

Ubuntu : Ubuntu 18.04 Extranet Mount Disk On Qnap Show

****** Not Work ไม่สำเร็จ CIFS VFS ยังขึ้นอยู่ ******

Ubuntu : Ubuntu 18.04 Extranet Mount Disk On Qnap Show CIFS VFS: Free previous auth ในหน้าจอ

Install cifs-utils
  1. sudo apt install cifs-utils


Create credentials file
  1. cat > ~/.smbcredentials

username=myusername
password=mypassword
ctrl+c

  1. sudo chown root ~/.smbcredentials
  2. sudo chmod 600 ~/.smbcredentials


Get UID for plex user account
id -u sa

I'll be using 1000 as the UID for this example
edit fstab file
  1. nano /etc/fstab


Note ip, sharename and username have been changed for privacy. Also vers=3.0 was set because that is the version of samba I have set on my nas.

Old Code
  1. #//192.168.0.218/backup  /BACKUP/BackupToQnap  cifs username=myusername,password=mypassword  0  0
  2. New Cose
  3. //192.168.0.218/backup /BACKUP/BackupToQnap cifs vers=3.0,iocharset=utf8,credentials=/home/sa/.smbcredentials,uid=1000 0 0


Load the new mount point
  1. mount -a


Test reboot จะไม่มีข้อความขึ้นอีก
https://askubuntu.com/questions/1048395/ubuntu-server-18-04-lts-getting-cifs-vfs-free-previous-auth-key-response

8/14/2019

Ubuntu : Ubuntu 18.04 Change Pasword root phpmyadmin

Ubuntu : Ubuntu 18.04 Change Pasword root phpmyadmin

User เริ่มต้น เป็น : phpmyadmin
รหัสตั้งตอนลง pypmyadmin

ต้องการใช้ user root หรือ sa
  1. sudo mysql
  2. SELECT user,authentication_string,plugin,host FROM mysql.user;
ตั้งรหัสของ root ใหม่
  1. SET PASSWORD 'root'@'localhost'=PASSWORD('mynewpasword');

ถ้า Error ไม่ผ่านใช้คำสั่ง
  1. ALTER USER 'root'@'localhost' IDENTIFIED WITH mysql_native_password BY 'mynewpassword';

ตามด้วย
  1. FLUSH PRIVILEGES;
สร้าง User ใหม่ sa
  1. mysql -u root -p
  2. CREATE USER 'NewUser'@'localhost' IDENTIFIED BY 'NewPassword';
  3. GRANT ALL PRIVILEGES ON *.* TO 'NewUser'@'localhost' WITH GRANT OPTION;
  4. exit

https://linuxhint.com/install_phpmyadmin_ubuntu_1804/

8/09/2019

Ubuntu :: Ubuntu 18.04 Set IP

Ubuntu :: Ubuntu 18.04 Set IP
1. Set ตอนที่ลงไม่ได้ Save แล้วกลับไป Reset หาย หน้านี้
2. ต้องต่อ Lan วง 0 เพื่อให้ได้รับ DHCP ถึงจะลงผ่าน แล้วค่อยไป เปลี่ยนให้ไปใช้ VM Network
3. Set Ip ที่ ไฟล์
  1. nano /etc/netplan/50-cloud-init.yaml

4. การ Set ห้ามใช้ Tab ให้ใช้ Space bar แทน แต่ละ : ต้องขนาดเท่ากัน ถึงจะผ่าน เช่น
  1. network:
  2.    version: 2
  3.    renderer: networkd
  4.    ethernets:
  5.       ens160:
  6.          addresses: [192.168.2.202/24]
  7.          gateway4: 192.168.2.2
  8.          nameservers:
  9.             addresses: [8.8.8.8,8.8.4.4,192.168.2.2]

5. คำสั่ง นำไปใช้
  1. netplan apply